WCF Web Services & iOS - Part 6 - Writing the iPhone app using XCode
By Mike Gledhill
At last, we have our collection of web services, reading and writing data to our SQL Server database, and it's time to write some code in XCode to get the data onto our iPhone.
Disclaimer
I'm not about to teach you iOS programming.
There are already plenty of excellent tutorials out there, such as The iOS Apprentice, and
the brilliant (and free to download from iTunes U)
iPad and iPhone
Application Development course
by Paul Hegarty.
This part of the tutorial assumes you have the following:
- A copy of XCode installed on an Apple Mac computer. (Sorry, but your Windows laptop is no use for this lesson.)
- Basic knowledge of using XCode.
For this lesson, you won't need an actual iPad or iPhone device, nor will you need to sign up for Apple's $99-a-year iOS Development Program (although you would need this, if you wanted to run your app on a real device, rather than the Simulator).
If you've followed the tutorial completely, you will have written some WCF Web Services, and deployed them onto a hosting site, accessible from throughout the world. For this lesson, we'll be referring to the two JSON Web Services which I've deployed here:
http://www.iNorthwind.com/Service1.svc/getAllCustomers
http://www.iNorthwind.com/Service1.svc/getOrdersForCustomer/ANATR
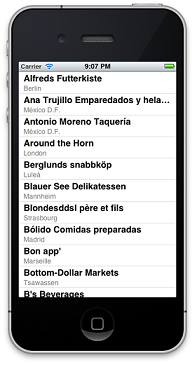
The following tutorial will show you how to call the getAllCustomers web service from your iOS application, parse its JSON data (as shown below) into a set of Customer records, then display the list of customers on the iPhone screen like this:
Welcome to XCode
Let's start by creating a new XCode project. Start XCode, and click on
File \ New \ Project.
On the first screen, select that we'll be creating a "Single View Application", then click on the Next button.
On the second screen, type in a Product Name of "NorthTest", a Company Identifier of "com.iNorthwind", change the Device Family to "iPhone", and
make sure "Use Storyboards" is ticked.
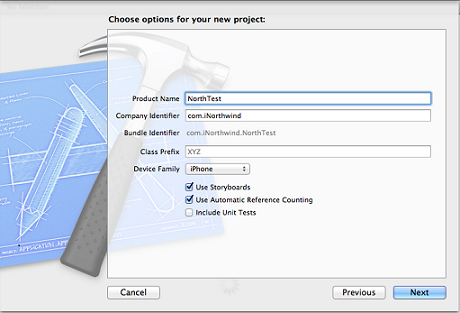
And on the third screen, just accept the default installation directory, and click on Create.
XCode will create a default set of project files for you. Let's start by having a
look at the "MainStoryboard.storyboard" file.
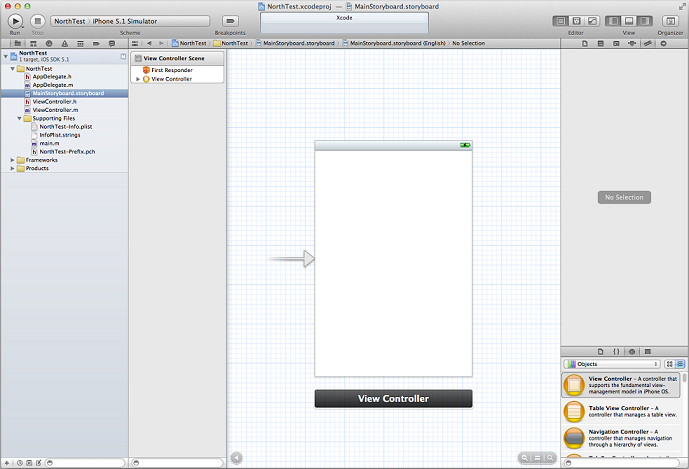
As you can see, XCode has put a blank View Controller screen in our Storyboard, but what we actually want is a Table View Controller screen. This is a screen which will fill our iPhone display, containing a scrollable list of rows, one per Customers record.
So, let's delete the View Controller screen. Click on the top of the View Controller, where the gray header is shown. A blue border will appear around the entire screen, then press the Delete key on your keyboard. The View Controller will disappear, and your Storyboard will now be empty.
Now, drag'n'drop a Table View Controller from the list of Objects (in the bottom-right of the XCode screen) onto the Storyboard. You'll notice that it is shown with an arrow to the left of it, to show that this is the entry point (or "Initial View Controller", as XCode calls it) for our application. This is the first screen which will appear when we run our app.
Next, we need to give a unique name to the Prototype Cells for this particular Table View. Click on the empty cell (the area below where it says Prototype Cells). The cell area will turn blue. Then click on the Attributes Inspector icon, and type in "PrototypeCustomerCell" in the Identifier text box.
Let's also change the Style from Custom to Subtitle, as we'll make each cell display two lines of information, the main text (the customer name) and a subtitle (the customer's country name).

Now, we must create a ("code-behind") Objective-C class, of type UITableViewController, which will handle how this screen works.
Click on File / New / File.
On the first screen, select that we want to create an "Objective-C class", then click on Next.
On the second screen, set the class name to "CustomersTableViewController", set the "Subclass of" value to "UITableViewController", then click on Next.

On the third screen, accept the default directory, and click on Create.
XCode will now create a CustomersTableViewController.m and a CustomersTableViewController.h file for you.
Now, we need to link our Table View Controller screen with these code-behind files.
Click on "MainStoryboard.storyboard" again, and click on the top of our Table View Controller screen to select it (it'll show the familiar blue outline again,
as shown below), then click on the "Identity Inspector" icon. In the class drop down list, select "CustomersTableViewController".

Now the tricky bit.
We need to make an XCode "Outlet" variable which refers to the Table View control in our Table View Controller screen. We need to create this so
that our Objective-C code can tell this Outlet how many rows to display on the screen, what values to put in each row, and so on.
In Visual Studio, we would just click on a control in the Designer screen and type in an ID in the Properties window (eg "CustomersListView") and we'd then be able to access the control from our C# code.
ListViewItem lvi = new ListViewItem("Brian Thecustomer");
CustomersListView.Items.Add(lvi);
In XCode, things really aren't that simple.
The easiest way to create an Outlet to our Table View control is to open the Storyboard and it's code-behind header file (.h file)
side-by-side, then drag a line from the Table View control (on the Storyboard) to the correct place in the header file.
To do this, in the Editor toolbar, click on the middle button, so the main area of the XCode screen is split in two.

Half of the screen will still show the Storyboard screen, and in the other half, you can now see the "CustomersTableViewController.h" file.
XCode may choose to show the two areas side-by-side, or on top of each other.
Hold down the CTRL key on your keyboard, then left-click on the header bar ("Prototype Cells") in the Table View Controller screen, and drag your mouse into the "CustomersTableViewController.h" file, between the @interface and @end lines.
Get it right, and as you drag the blue line into the right place in the .h file, a popup message will appear: "Insert Outlet or Outlet Collection." At this point, you can release the mouse button, and a popup dialog will appear, asking what you want to call your new variable.

Do make sure that the "Type" in this popup dialog does show the correct type of "UITableView". If it doesn't, press the ESC key, and try again. (If it shows "UITableViewCell" instead, that would suggest that you've CTRL+dragged from the cell, rather than the gray header bar in this screen.)
Let's type in a UITableView variable name of "tvCustomers", then click on the Connect button.
The good news is that that's all we need to do on the Storyboard for this particular screen.
Now, we just need to write some Objective-C code to fill an array with a list of Customer data, then get our tvCustomers control to display it.
Time for some Objective-C !
Our plan is to write some which will read in our JSON data, and store it as an array of Customer records. But, of course, our XCode project has no idea what a Customer record looks like yet, so let's start there.
Click on File, New, File, select "Objective-C class" as the file type, click on Next, then create a class called "Customer" and select that it's a Subclass of "NSObject". Accept the default directory, and click on Create.
Open up the new Customer.h file, and paste these lines:
@interface Customer : NSObject
@property(strong, nonatomic) NSString * Customer_ID;
@property(strong, nonatomic) NSString * Company_Name;
@property(strong, nonatomic) NSString * City;
@end
Then hop across to the Customer.m file and paste these lines:
@implementation Customer
@synthesize Customer_ID;
@synthesize Company_Name;
@synthesize City;
@end
Before we start to tackle the JSON code, let's add a sample (hard-coded) Customer record, and get our app to display it.
Next, we need to add a Mutable Array to our Table View Controller class, which will store our array of Customer records.
Open the CustomersTableViewController.h file, add a NSMutableArray variable...
@property (strong, nonatomic) NSMutableArray *listOfCustomers;
� and at the top of the CustomersTableViewController.m file, let's synthesize it:
@implementation CustomersTableViewController
@synthesize tvCustomers;
@synthesize listOfCustomers;
...
Notice that we haven't needed to say what type of values our NSMutableArray will be storing. XCode looks after that for us.
Okay, let's add a sample Customer record to our array, and get our app to display it.
At the top of the CustomersTableViewController.m file, and add the following line below the other #imports.
#import "Customer.h"
Then, find the viewDidLoad function, and add this code to it:
- (void)viewDidLoad
{
[super viewDidLoad];
// Uncomment the following line to preserve selection between presentations.
// self.clearsSelectionOnViewWillAppear = NO;
// Uncomment the following line to display an Edit button in the navigation bar for this view controller.
// self.navigationItem.rightBarButtonItem = self.editButtonItem;
listOfCustomers = [NSMutableArray arrayWithCapacity:10];
Customer* cust = [[Customer alloc] init];
cust.Customer_ID = @"ABC123";
cust.Company_Name = @"James Customer";
cust.City = @"Switzerland";
[listOfCustomers addObject:cust];
}
Now, when we first go into this screen, it'll create and initialise our NSMutableArray, and add one Customer record to it.
The next step is to modify the UITableView functions to make it display the values in our array.
Staying in the CustomersTableViewController.m file, find the numberOfSectionsInTableView function, and change it to this:
- (NSInteger)numberOfSectionsInTableView:(UITableView *)tableView
{
// We're only going to have one section
return 1;
}
Then find the numberOfRowsInSection function, and change it to this:
- (NSInteger)tableView:(UITableView *)tableView numberOfRowsInSection:(NSInteger)section
{
return listOfCustomers.count;
}
Now, our UITableView knows there'll be one long list of results (not split up into sections), and it now knows how many items
it will need to display.
Our final step is to tell it what to put in each cell in our list:
- (UITableViewCell *)tableView:(UITableView *)tableView cellForRowAtIndexPath:(NSIndexPath *)indexPath
{
static NSString *CellIdentifier = @"PrototypeCustomerCell";
UITableViewCell *cell = [tableView dequeueReusableCellWithIdentifier:CellIdentifier];
Customer* cust = [listOfCustomers objectAtIndex:indexPath.row];
cell.textLabel.text = cust.Company_Name;
cell.detailTextLabel.text = cust.City;
return cell;
}
Notice how we have to say which UITableView prototype cell we're going to be filling.
static NSString *CellIdentifier = @"PrototypeCustomerCell";
This is why we had to set the name of our "Prototype Cell" in the Storyboard earlier.
Be very careful at this point.
Sometimes, XCode is incredibly stupid, and this is one of those moments.
XCode provides you with some default code for the cellForRowAtIndexPath
function.
However, if you see that it is trying to call the dequeueReusableCellWithIdentifier
function with a forIndexPath parameter, like this:
UITableViewCell *cell = [tableView dequeueReusableCellWithIdentifier:CellIdentifier forIndexPath:indexPath];
..then delete this parameter, so it looks like this...
UITableViewCell *cell = [tableView dequeueReusableCellWithIdentifier:CellIdentifier];
Why does this matter ?
Well, because if you don't delete this parameter, your app will
work a treat on iOS 6 devices, and crash when it's run on iOS 5 (or earlier) devices.
Utterly ridiculous.
Voila, I've just saved you a desperate hour of Googling when your perfectly tested iOS app
suddenly crashes whenever it's run on your boss's (un-upgraded) iPhone.
Phew !
Finally, it's time to build the project, and run it on the Simulator.
You should see our beautiful Table View showing our sample record.

If you're new to iOS development, you'll appreciate that we're tackling this application piece by piece:
getting the Storyboard setup first, then creating our array and adding a record to it, and now getting our UITableView to display it.
Once we're satisfied that this is all working (and that we understand how we've got this far), we can safely move on to loading the JSON data.
Loading the JSON data
Now it's time to populate our TableListView using data from our JSON web service. This is straightforward, as long as you have an example of what your JSON will look like. For us, we know that our list of customers will come from this service:
http://www.iNorthwind.com/Service1.svc/getAllCustomers
And the data looks like this:
{
GetAllCustomersResult: [
{
City: "Berlin",
CompanyName: "Alfreds Futterkiste",
CustomerID: "ALFKI"
},
{
City: "M�xico D.F.",
CompanyName: "Ana Trujillo Emparedados y helados",
CustomerID: "ANATR"
},
{
City: "M�xico D.F.",
CompanyName: "Antonio Moreno Taquer�a",
CustomerID: "ANTON"
},
... etc...
We're going to add a "helper function" to our application which can call a URL, parse the
JSON data that it returns, and convert the results into a NSDictionary object.
We're probably going to need to call this function from more than one file, so we'll put this function in its
own .m and .h file.
Click on File / New / File, create a new "Objective-C Class" file. Type in a class name of JSONHelper, and set the Subclass as NSObject.
In the JSONHelper.m file, cut'n'paste the following function in between the @implementation and @end lines.
Notice the first character - that plus-sign tells Xcode that this is a static function.
+(NSDictionary *)loadJSONDataFromURL:(NSString *)urlString
{
// This function takes the URL of a web service, calls it, and either returns "nil", or a NSDictionary,
// describing the JSON data that was returned.
//
NSError *error;
NSURL *url = [NSURL URLWithString:urlString];
NSMutableURLRequest *request = [NSMutableURLRequest requestWithURL:url];
[request setHTTPMethod:@"GET"];
[request setValue:@"application/json" forHTTPHeaderField:@"Content-Type"];
// Call the web service, and (if it's successful) store the raw data that it returns
NSData *data = [ NSURLConnection sendSynchronousRequest:request returningResponse: nil error:&error ];
if (!data)
{
NSLog(@"Download Error: %@", error.localizedDescription);
return nil;
}
// Parse the (binary) JSON data from the web service into an NSDictionary object
id dictionary = [NSJSONSerialization JSONObjectWithData:data options:kNilOptions error:&error];
if (dictionary == nil) {
NSLog(@"JSON Error: %@", error);
return nil;
}
return dictionary;
}
In the JSONHelper.h file, paste the following declaration in between the @Interface and @end lines.
+(NSDictionary *)loadJSONDataFromURL:(NSString *)urlString;
Right then, our TableViewController screen is going to call this function, so first stop is at the top of the CustomersTableViewController.m file. Add the following import.
#import "JSONHelper.h"
In the same file, we'll now add a function which calls the web service using this loadJSONDataFromURL function, then parses the JSON data in a set of Customer records.
You'll notice that we load the JSON in a background thread, so if the service is running slow, it won't slow down the iPhone's UI. Once the JSON data has been loaded and stored in our listOfCustomers array, then we'll return to the main thread, and ask for the tableView's data to be reloaded.
-(void)loadCustomerRecords
{
listOfCustomers = nil;
NSString* WebServiceURL = @"http://www.inorthwind.com/Service1.svc/getAllCustomers";
dispatch_queue_t queue = dispatch_get_global_queue(DISPATCH_QUEUE_PRIORITY_DEFAULT, 0);
dispatch_async(queue, ^{
// Get the JSON string from our web serivce
NSDictionary * dictionary = [JSONHelper loadJSONDataFromURL:WebServiceURL];
dispatch_async(dispatch_get_main_queue(), ^{
// Get a list of results in the Dictionary
NSArray *results = [dictionary objectForKey:@"GetAllCustomersResult"];
listOfCustomers = [NSMutableArray array];
for (NSDictionary * oneCustomer in results)
{
// Create a new Customer record
Customer * newCustomer = [[Customer alloc] init];
newCustomer.Customer_ID = [oneCustomer objectForKey:@"CustomerID"];
newCustomer.Company_Name = [oneCustomer objectForKey:@"CompanyName"];
newCustomer.City = [oneCustomer objectForKey:@"City"];
// Add our new Customer record to our NSMutableArray
[listOfCustomers addObject:newCustomer];
}
dispatch_async(dispatch_get_main_queue(), ^{
// This code will run once the JSON-loading section above has completed.
[self.tableView reloadData];
});
});
});
}
One last change.
We need to get our viewDidLoad function to call this loadCustomerRecords function.
- (void)viewDidLoad
{
[super viewDidLoad];
// Uncomment the following line to preserve selection between presentations.
// self.clearsSelectionOnViewWillAppear = NO;
// Uncomment the following line to display an Edit button in the navigation bar for this view controller.
// self.navigationItem.rightBarButtonItem = self.editButtonItem;
[self loadCustomerRecords];
}
Okay, let's re-build the application, and test that it can retrieve the JSON data from our web service.

Et, voila !
We finally have our Northwind data on our iPhone, ready for access at a moment's notice !
We've skipped a lot of steps, such as error checking and displaying a "Loading.." message in the UITableView while
we're loading the JSON data, but the iOS Apprentice course
describes this better than I ever could.
(And no, I don't work for them, or earn any money for recommending them !)
Comments