Master-Detail page, using JavaScript
By Mike Gledhill
In Part 9, we showed how to load data from a JSON WCF Web Service, use AngularJS to display it in a drop down list with further details below.

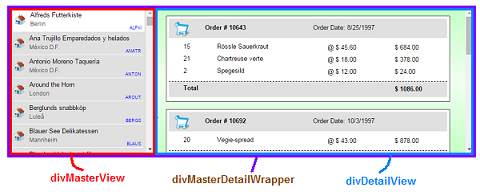
One other common use of JSON is to display webpages split into a Master-Detail view.
The Master view displays a list of all records down the left-hand side, with full details about one particular record taking up most of the right-hand part of the page.
Try clicking on a customer, in the left-hand panel below, and watch as their orders get displayed.
Let's walkthrough how we would do this without using AngularJS first, and then, in the next part of this tutorial, we'll do it again, using AngularJS.
How it works
To create a page like this, first, we need to create our Master and Detail <div>s, and wrap them in
an outer <div>.

Here's our HTML markup:
<div id="divMasterDetailWrapper">
<div id="divMasterView"></div>
<div id="divDetailView"></div>
</div>
Crucially, our two inner<div>s need to appear side-by-side. The left hand
<div> will always have a width of 300px, and right-hand <div> will fill the
rest of the space. And we need to enable overflow-y, to make vertical scrollbars appear if we have
many records to display.
We achieve this using CSS.
#divMasterDetailWrapper
{
width: 100%;
height: 300px;
border: 1px solid Green;
padding: 3px;
}
#divMasterView
{
width: 300px;
height: 300px;
background-color: #E0E0E0;
margin-right: 5px;
overflow-y: auto;
float: left;
}
#divDetailView
{
height: 300px;
padding: 0;
display: block;
overflow-y: auto;
}
By the way, you can view all of the CSS used in this demonstration here:
MasterDetailStyles.cssLoading the JSON data
Our next step is to load the list of "Customer" records from our WCF Web Service, and display them in our Master View.
Here's the function which does the hard work:
function LoadCustomersAndOrders()
{
// Empty our Master View (remove any "Customer" <div> records we've previously appended into it)
$("#divMasterView").empty();
// Call our WCF Web Service to load a JSON list of "Customer" records
var commandURL = "http://inorthwind.azurewebsites.net/Service1.svc/getAllCustomers";
$.ajax({
url: commandURL,
type: 'GET',
cache: false,
dataType: "json",
success: function (JSON) {
// We've successfully loaded our JSON data
$.each(JSON.GetAllCustomersResult, function (inx) {
// Create one <div> per JSON record, and append it to our "Master View" <div>.
var newDiv = CreateCustomerDiv(this);
$("#divMasterView").append(newDiv);
// If the user left-clicks on this <div>, load the Orders that this Customer has made
var CustomerID = this.CustomerID;
$(newDiv).click(function (event) {
LoadOrderDetails(newDiv, CustomerID);
});
// By default, we'll select the first "Company" record, and display its Orders
if (inx == 0) {
LoadOrderDetails(newDiv, CustomerID);
}
});// End of our $.each loop
},
error: function (xhr, ajaxOptions, thrownError) {
alert("$.ajax error: " + xhr.status + " " + thrownError);
}
});
}
As you can see, this code doesn't use AngularJS (we'll get to that later !).
It loads the list of JSON records from our service, iterates through them, and for each Customer record, it calls a CreateCustomerDiv function.
function CreateCustomerDiv(JSONrecord)
{
// Create a <div> containing field values from our "Customer" JSON record
//
// {
// City: "Berlin",
// CompanyName: "Alfreds Futterkiste",
// CustomerID: "ALFKI"
// }
//
// For this "Customer" record, we'll create an "outer" div, of a particular height & width, then append
// other <div>s within it, one for the Company Name, one for the City, and so on.
var iDiv = document.createElement('div');
iDiv.id = JSONrecord.CustomerID;
iDiv.className = 'cssOneCompanyRecord';
var iDivCompanyName = document.createElement('div');
iDivCompanyName.className = 'cssCompanyName';
iDivCompanyName.innerHTML = JSONrecord.CompanyName;
iDiv.appendChild(iDivCompanyName);
var iDivCompanyCity = document.createElement('div');
iDivCompanyCity.className = 'cssCompanyCity';
iDivCompanyCity.innerHTML = JSONrecord.City;
iDiv.appendChild(iDivCompanyCity);
var iDivCustomerID = document.createElement('div');
iDivCustomerID.className = 'cssCustomerID';
iDivCustomerID.innerHTML = JSONrecord.CustomerID;
iDiv.appendChild(iDivCustomerID);
var oImg = document.createElement("img");
oImg.setAttribute('src', '/images/icnOffice.png');
oImg.setAttribute('title', "This is a tooltip for company: " + JSONrecord.CompanyName);
oImg.setAttribute('class', 'cssCustomerIcon');
iDiv.appendChild(oImg);
// Once we've created this <div> (and it's sub-divs) we'll return it back to the caller, so it
// can append it to the Details View <div>.
return iDiv;
}
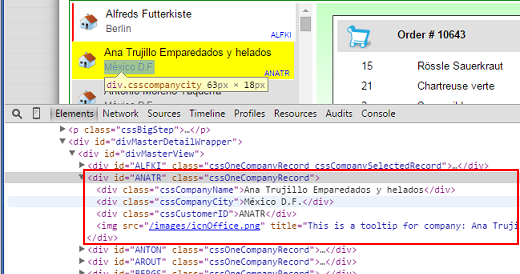
The easiest way to explain what this function does is to see an example, in Google Chrome, of what one Customer
<div> element looks like.
Here's what what one Customer <div> looks like, using Google Chrome.

As you can see, we create an outer <div>, set its CSS class to cssOneCompanyRecord, then extra
append extra <div>s to it, one for each Customer field that we want to display.
Each Customer field uses its own CSS class, so for each field, we can set it's position, font size, color, etc.
.cssOneCompanyRecord {
height: 47px;
width: 98%;
position: relative;
/* Very important, for appending child <div>s with absolute positioning later */
border-bottom: 1px solid white;
}
.cssCompanyName
{
position:absolute;
left: 40px;
top: 5px;
}
.cssCompanyCity
{
position:absolute;
left: 40px;
top: 23px;
color: #505050;
font-size: 0.9em;
}
...etc...
We use the same idea for populating the Master View <div>, when the user clicks on a particular Customer record.
Have a look at this page's Source, at the LoadOrderDetails function, if you want to see how I did it.
Master-View pages summary
And that's it. From JSON data, to a beautiful web page.
On the next part of this tutorial, I'll show how much easier (and more concise) this is when we use AngularJS, but I still really like this non-Angular code. I find it really good looking, responsive and very maintainable (if another developer needs to work on it).
Comments