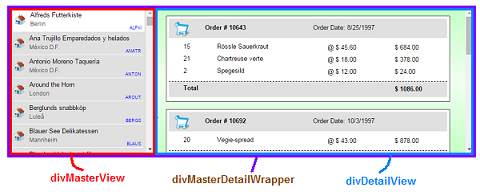
Master-Detail page, using AngularJS
By Mike Gledhill
In our last example, we showed how to load create a Master-Detail page, from a JSON WCF Web Service, without using AngularJS.
Now, it's time to show how much easier the same page is to create using AngularJS.

I'm slightly biased (!), but I think this is a cracking example of using AngularJS.
It really shows how little coding you need to do, to turn JSON data into something beautiful.
The ingredients
To create this Master-Detail view, I needed four ingredients.
1. Two web services, one to fetch a list of all Customer names (for the Master view) and one to load all of the Orders
for a particular Customer (for the Detail view).
You can click on these links to view the raw data which our views are based on.
http://inorthwind.azurewebsites.net/Service1.svc/getAllCustomers
http://inorthwind.azurewebsites.net/Service1.svc/getBasketsForCustomer/ANATR
2. Our AngularJS code, which you can download/view here:
3. Some HTML markup (which is shown below) which binds to the AngularJS variables.
4. Some CSS to beautifully format the data, and position each label correctly.
The Master-Detail View CSS
Just like in our previous example (which didn't use AngularJS),
the starting point for our Master-Detail view is two
<div> elements, wrapped in an outer <div>.

The CSS to create these side-by-side <div>s is shown in the previous example.
We then need some code to do the following:
- call our "getAllCustomers" web service, to load our JSON list of customer records
- get AngularJS to generate a set of
<div>elements in the Master View, one<div>per customer record - when the user clicks on a customer record, we'll call our "getBasketsForCustomer" web service to load that customer's list of orders
- then, we'll get AngularJS to generate some nested
<div>s in our Detail View, one per order.
The HTML
The big win with using AngularJS is that much of our logic is contained within the HTML.
We can just load the JSON data, and leave AngularJS to iterate through it, creating <div>s as needed.
We no longer have to write jQuery or JavaScript code to manually iterate through our records, creating <div>s.
All we have to do is to get the AngluarJS directives right !
<div id="divMasterDetailWrapper" ng-controller='MasterDetailCtrl' style="position:relative;">
<!-- First, we have our left-hand list of Customer names -->
<div id="divMasterView">
<div id="{{customer.customerid}}" class="cssOneCompanyRecord" ng-class="{cssCompanySelectedRecord: Customer.CustomerID == selectedCustomer}" ng-repeat='Customer in listOfCustomers' ng-click="selectCustomer(Customer);">
<div class="cssCompanyName">{{Customer.CompanyName}}</div>
<div class="cssCompanyCity">{{Customer.City}}</div>
<div class="cssCustomerID">{{Customer.CustomerID}}</div>
<img src='/images/icnOffice.png' title="This is a tooltip for the company: {{Customer.CompanyName}}" class="cssCustomerIcon" />
</div>
</div>
<!-- Then, we have our right-hand panel, showing one Customer's orders -->
<div id="divDetailView">
<!-- Get AngularJS to create one DIV for each Order that this Customer has made. -->
<div id="Order_{{Order.OrderID}}" ng-repeat="Order in listOfOrders" class="cssOneOrderRecord">
<!-- Each Order will have a header bar, with Order ID and date. -->
<div class="cssOneOrderHeader">
<div class="cssOrderID">Order # {{Order.OrderID}}</div>
<div class="cssOrderDate">Order Date: {{Order.OrderDate}}</div>
</div>
<!-- AngularJS will create one DIV for each Product in this particular Order -->
<div class="cssOneProductRecord" ng-repeat='Product in Order.ProductsInBasket' ng-class="{ cssProductEven: (($index%2) == 0), cssProductOdd: ($index%2)}">
<div class="cssOneProductQty">{{Product.Quantity}}</div>
<div class="cssOneProductName">{{Product.ProductName}}</div>
<div class="cssOneProductPrice">@ {{Product.UnitPrice | currency}}</div>
<div class="cssOneProductSubtotal">{{Product.UnitPrice * Product.Quantity | currency}}</div>
</div>
<!-- The fiddly bit - calculating totals for this Order -->
<div class="cssOneOrderTotal">
<div class="cssOneProductQty">
{{Order.ProductsInBasket|countItemsInOrder}} item(s), {{Order.ProductsInBasket.length}} product(s)
</div>
<div class="cssOneProductSubtotal">
{{Order.ProductsInBasket|orderTotal | currency}}
</div>
</div>
</div>
</div>
</div>
As you can see, I've deliberately added comments, to give hints about what some of these <div>s are being
used for.
It's very easy to have baffling looking HTML, which'll make sense to you, and confuse the hell out of any other developers who have to maintain your code.
The AngularJS code
Let's just have a quick look at how much work AngularJS has just done for us.
In our AngularJS controller file, we have a very simple piece of code which calls our JSON web service, and saves the
array of customer records to a $scope.listOfCustomers variable.
$http.get('http://inorthwind.azurewebsites.net/Service1.svc/getAllCustomers ')
.success(function (data) {
$scope.listOfCustomers = data.GetAllCustomersResult;
Then, in our HTML, we ask AngularJS to create a new <div> for each of the records in the listOfCustomers variable, using the ng-repeat directive.
<div id="{{customer.customerid}}"
class="cssOneCompanyRecord"
ng-class="{cssCompanySelectedRecord: Customer.CustomerID == selectedCustomer}"
ng-repeat='Customer in listOfCustomers'
ng-click="selectCustomer(Customer);">
<div class="cssCompanyName">{{Customer.CompanyName}}</div>
<div class="cssCompanyCity">{{Customer.City}}</div>
<div class="cssCustomerID">{{Customer.CustomerID}}</div>
<img src='/images/icnOffice.png' title="This is a tooltip for the company: {{Customer.CompanyName}}" class="cssCustomerIcon" />
</div>
So, for each customer record that AngurlarJS finds in the listOfCustomers variable, the ng-repeat line
(shown in red) will create one "cssOneCompanyRecord" <div> in the DOM, containing the four lines shown in blue.
This is how we get one Company Name, City and Customer ID code label in each item of our list, along with the little house icon.
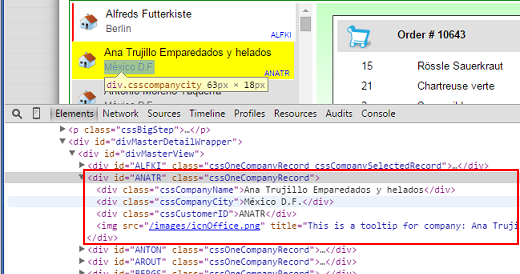
Here's how one customer record looks like, viewed in Google Chrome.

The interesting thing about this demonstration is that it uses almost the same AngularJS code as our previous AngularJS example. So, we have two completely different views of the same data. All we had to change was the HTML.
The only difference is that before, the user would select a Customer from a drop down list and that would automatically
set the selectedCustomer value and trigger our loadOrders function.
<select ng-options="customer.CustomerID as customer.CompanyName for customer in listOfCustomers" ng-change="loadOrders();" ></select>
In this example, we need to set the selectedCustomer value and call the loadOrders function
when the user clicks on a <div>.
We do this by adding an ng-click directive to the <div>.
<div ... ng-click="selectCustomer(Customer);" >
...which calls this small selectCustomer function..
$scope.selectCustomer = function (val) {
// If the user clicks on a <div> , the ng-click will call this function, to set a new selected Customer.
$scope.selectedCustomer = val.CustomerID;
$scope.loadOrders();
}
I also slipped in some others tricks into this example.
AngularJS tricks: Alternating CSS classes
In each Order (in the Master View), I alternate the Product CSS classes.
Even-numbered rows get the class cssProductEven, odd-numbered rows get the class cssProductOdd.
To do this, we can use the ng-class-odd and ng-class-even directives.
<div class="cssOneProductRecord" ng-repeat='..' ng-class-odd="'cssProductOdd'" ng-class-even="'cssProductEven'" >
Be careful with this syntax- notice that the CSS class names are wrapped in a set of apostrophes and speechmarks.
You can achieve the same effect using the ng-class directive, and examining the $index value:
<div class="cssOneProductRecord" ng-repeat='..' ng-class="{ cssProductEven: (($index%2) == 0), cssProductOdd: ($index%2) }" >
AngularJS tricks: Showing which item is selected
In our example, when the user clicks on a customer record (in the left hand panel), we want that Customer's <div>
to have the cssCompanySelectedRecord CSS class added to it, to show the user that that customer is now selected.
With AngularJS's ng-class directive, this is really easy (if you have a nice example to copy off !)
<div id="{{customer.customerid}}"
class="cssOneCompanyRecord"
ng-class="{cssCompanySelectedRecord: Customer.CustomerID == selectedCustomer}"
ng-repeat='Customer in listOfCustomers'
ng-click="selectCustomer(Customer);"></div>
How cool is that ?
Notice the Customer variable, which AngularJS will compare to the selectedCustomer value.
AngularJS tricks: Subtotals
You'll also see that each Order features a footer bar, showing how many unique Products were in the Order, the total number of items in that order, and the Order Total.

This is a little frustrating in AngularJS.
In previous versions of AngularJS, you could use $sum directive to calculate the totals, as shown here, but this
is no longer supported, so we have to write our own calculation functions.
When I first wrote this code, I used a sumByKey function, which you can find in numerous articles on the web.
For example, to calculate how many items each order contained, I previously had this code:
// HTML
{{Order.ProductsInBasket|sumByKey:'Quantity'}} item(s)
// The AngularJS code
myApp.filter('sumByKey', function () {
return function (data, key) {
if (typeof (data) === 'undefined' || typeof (key) === 'undefined') {
return 0;
}
var sum = 0;
for (var i = data.length - 1; i >= 0; i--) {
sum += parseInt(data[i][key]);
}
return sum;
};
})
As you can see, this calls a sumByKey function, which adds up all of the 'Quantity' values
in our set of Product records.
This worked fine, but for maintainability, if we wanted to reuse this calculation value on other pages, would we really
want to quote that Quantity JSON field name each time, or does it make more sense to keep that in the
AngularJS code ?
So, I chose to change the code to this:
// HTML
{{Order.ProductsInBasket|countItemsInOrder}} item(s)
// The AngularJS code
myApp.filter('countItemsInOrder', function () {
return function (listOfProducts) {
// Count how many items are in this order
var total = 0;
angular.forEach(listOfProducts, function (product) {
total += product.Quantity;
});
return total;
}
});
The total number of items now comes from a countItemsInOrder function in our AngularJS code.
Either of these two methods are fine. Perhaps the original sumByKey version is more reusable, whereas the
countItemsInOrder function is more maintainable.
I'll leave you to decide which you prefer.
Summary
And that's it.
I hope you found this AngularJS example useful, and that it has given you ideas of how to easily turn your own JSON data into something beautiful.
Comments

